Findaid Class Instructors: Tom Burton-West, Chris Powell
This portion of the DLXS Workshop focuses on implementing a collection in the Findaid Class. Since EAD encoding practices vary widely we will highlight issues arising from different encoding practices and how to resolve them.
More general documentation:Data Preparation
The end result of these steps is a file containing the concatenated EADs wrapped in a <COLL> element which validates against the dlxsead2002 and is ready for indexing:
<COLL>
    <ead><eadheader><eadid>1</eadid>...</eadheader>... content</ead>
    <ead><eadheader><eadid>2</eadid>...</eadheader>... content</ead>
    <ead><eadheader><eadid>3</eadid>...</eadheader>... content</ead>
</COLL>
Indexing
In Findaid Class Encoding Practices and Processes we discuss the elements and attributes required for "out of the box" Findaid Class delivery, various encoding issues, and preparing the work environment and validating the data.
These instructions assume that you have already encoded your finding aids files in the XML-based EAD 2002 DTD. If you have finding aids encoded using the older EAD 1.0 standard or are using the SGML version of EAD2002, you will need to convert your files to the XML version of EAD2002. When converting from SGML to XML a number of character set issues may arise. These are disccused in Data Conversion: Unicode, XML, and Normalization .
Resources for converting from EAD 1.0 to EAD2002 and/or from SGML EAD to XML EAD and good sources of information about EAD encoding practices and practical issues involved with EADs are described in the documentation wiki: EAD 2002 DTD Overview
The EAD standard was designed as a “loose” standard in order to accommodate the large variety in local practices for paper finding aids and make it easy for archives to convert from paper to electronic form. As a result, conformance with the EAD standard still allows a great deal of variety in encoding practices.
The DLXS software is primarily designed as a system for mounting University of Michigan collections. In the case of finding aids, the software has been designed to accommodate the encoding practices of the Bentley Historical Library. The more similar your data and setup is to the Bentley’s, the easier is will be to integrate your finding aids collection with DLXS. If your practices differ significantly from the Bentley’s, you will probably need to do some preprocessing of your files and/or modifications to various files in DLXS. We have found that the largest number of issues in implementing Findaid Class for member institutions is dealing with differences in encoding practices. We will cover various issues that commonly arise.
Links to more information on the Bentley's encoding practices and workflow are available Practical EAD Encoding Issues You may also want to look at Examples of Findaid Class Implementations and Practices
Some of the types of changes you may need to make to DLXS to accomodate differences are listed at: Types of changes to accomodate differing encoding practices and will be discussed later in the section on Customizing Findaid Class
There are a number of encoding issues that may affect the data preparation, indexing, searching, and rendering of your finding aids. A discussion of many of these can be found at Specific Encoding Issues We will discuss many of these in the section on Customization A few of the more important ones are:
For today, we are going to be working with some EADs that are already in Findaid Class. Findaid Class comes with a sample collection called samplefa. When you are working with your own collection, you may find it helpful to use the samplefa configuration files and data preparation scripts as a starting point for customizing DLXS Findaid class for your collection.
Today, we will be building collection based on the sample finding aids, configuration files and scripts from samplefa. We are going to call our collection workshopfa. We will be doing a number of steps by hand one at a time. There are some scripts which automate much of this work, but we have found that when people have the experience of doing each of the steps by hand, they are better able to understand and troubleshoot if there is any problem running the automated scripts.
This documentation will make use of the concept of the $DLXSROOT, which is the place at which your DLXS directory structure starts. We generally use /l1/, but for the workshop, we each have our own $DLXSROOT in the form of /l1/workshop/userX/dlxs/. To check your $DLXSROOT, type the following commands at the command prompt:
cd $DLXSROOT
pwd
The prep directory under $DLXSROOT is the space for you to take your encoded finding aids and "package them up" for use with the DLXS middleware. Create your basic directory $DLXSROOT/prep/w/workshopfa and its data subdirectory with the following command:
mkdir -p $DLXSROOT/prep/w/workshopfa/data
Move into the prep directory with the following command:
cd $DLXSROOT/prep/w/workshopfa
This will be your staging area for all the things you will be doing to your texts, and ultimately to your collection. At present, all it contains is the data subdirectory you created a moment ago. We will be populating it further over the course of the next two days. Unlike the contents of other collection-specific directories, everything in prep should be ultimately expendable in the production environment.
Copy the necessary files into your data directory with the following commands:
cp $DLXSROOT/prep/s/samplefa/data/*.xml $DLXSROOT/prep/w/workshopfa/data/.
We'll also need a few files to get us started working. They will need to be copied over as well, and also have paths adapted and collection identifiers changed. Follow these commands:
cp $DLXSROOT/prep/s/samplefa/samplefa.ead2002.dcl $DLXSROOT/prep/w/workshopfa/workshopfa.ead2002.dcl
cp $DLXSROOT/prep/s/samplefa/samplefa.concat.ead.dcl $DLXSROOT/prep/w/workshopfa/workshopfa.concat.ead.dcl
mkdir -p $DLXSROOT/obj/w/workshopfa
mkdir -p $DLXSROOT/bin/w/workshopfa
cp $DLXSROOT/bin/s/samplefa/preparedocs.pl $DLXSROOT/bin/w/workshopfa/preparedocs.pl
cp $DLXSROOT/bin/s/samplefa/Makefile $DLXSROOT/bin/w/workshopfa/Makefile
Now you'll need to edit the copy of the Makefile to ensure that the path matches your $DLXSROOT and that the collection name is workshopfa instead of samplefa .
You will want to change lines 1- 3 to point to your $DLXSROOT and replace s/samplefa with w workshopfa: Change:1 DLXSROOT=/l1 2 NAMEPREFIX = samplefa 3 FIRSTLETTERSUBDIR = sTo:
   1  DLXSROOT=/your/dlxsroot/here
   2  NAMEPREFIX = workshopfa
   3  FIRSTLETTERSUBDIR = w
cd $DLXSROOT/bin/w/workshopfa
vi Makefile
STOP!! Make sure you edit the Makefile before going to the next steps!!
You can run this command to check to see if you forgot to change samplefa to workshopfa:
grep "samplefa" $DLXSROOT/bin/w/workshopfa/* $DLXSROOT/prep/w/workshopfa/* |grep -v "#"
Tips: Be sure not to add any space after the workshopfa or w. The Makefile ignores space immediately before and after the equals sign but treats all other space as part of the string.
The easiest way to check for these kinds of errors is to use "cat -vet Makefile" to show all spaces, tabs and newlines.
If you modify or write your own Make targets, you need to make sure that a real "tab" starts each command line rather than spaces.
If you are doing this at your home institution instead of at the workshop, please refer to the more detailed instrctions on the wiki: Step by Step Instructions for setting up Directories for Data Preparation
With the ready-to-go ead2002 encoded finding aids files in the data directory, we are ready to begin the preparation process. This will include:
These steps are generally handled via the Makefile in $DLXSROOT/bin/s/samplefa which we have copied to $DLXSROOT/bin/w/workshopfa. and edited.
Step 1: Validating the files individually against the EAD 2002 DTD
cd $DLXSROOT/bin/w/workshopfa
make validateeach
Detailed description of what commands the Makefile is running for any of the steps described here,as well as common error messages and troubleshooting techniques are described on the wiki. As an example this section decribes in detail what the "make validate" command does.
In this case the make validate command checks each of the EADs in the data subdirectory to make sure they conform with the EAD 2002 DTD. If validation errors occur, error files will be in the data subdirectory with the same name as the finding aids file but with an extension of .err.
Check the error files by running the following commands
If there are any *err files, you can look at them with the following command:ls -l $DLXSROOT/prep/w/workshopfa/data/*err
less $DLXSROOT/prep/w/workshopfa/data/*err
If there are validation errors, fix the problems in the source XML files and re-run. If you have errors at any step in the preparation and indexing process, it is essential to fix the errors before moving on to the next step. There are not likely to be any errors with the workshopfa data, but tell the instructor if there are.
Step 2: Concatentating the files into one larger XML file (and running some preprocessing commands)
This step runs the preparedocs.pl script which does two sets of things:cd $DLXSROOT/bin/w/workshopfa make prepdocs
Concatenating files in a different order or only concatenating a subset of files
The default order for search results in Findaid Class is the order they were concatenated. If you want to change the default order or if you have a reason to only index some of the files in your data directory, please see Concatenating the files into one larger XML file for details
Step 3: Validating the concatenated file against the dlxsead2002 DTD
make validate
This runs the onsgmls command against the concatenated file using the dlxs2002dtd, and writes any errors to the workshopfa.errors file in the appropriate subdirectory in $DLXSROOT/prep/c/collection.. More details
Check for errors by running the following command
If there is a workshopfa.errors file with a non-zero size, then run the following command to look at the errors reported:ls -l $DLXSROOT/prep/w/workshopfa/workshopfa.errors
less $DLXSROOT/prep/w/workshopfa/workshopfa.errorsIf you see this warning in the errors file:
onsgmls:/l1/dev/tburtonw/misc/sgml/xml.dcl:1:W: SGML declaration was not impliedYou can ignore it, but if you see any other errors STOP! You need to determine the cause of the problem, fix it, and rerun the steps until there are no errors from make validate. If you continue with the next steps in the process with an invalid xml document, the errors will compound and it will be very difficult to trace the cause of the problem.
If you see errors at this point and there were no errors during the validateeach step, the likely cause was a problem with the preparedocs.pl processing. See "Common common causes of error messages and solutions" in Validating the Concatenated Filess for troubleshooting
Step 4: Normalizing the concatenated file
make normThis command runs a series of copy commands and normalizes your data in a two step process. (For more details see: Normalizing the concatenated file ) These commands ensure that your collection data is normalized. What this means is that any attributes are put in the order in which they were defined in the DTD. Even though your collection data is XML and attribute order should be irrelevant (according to the XML specification), due to a bug in one of the supporting libraries used by xmlrgn (part of the indexing software), attributes must appear in the order that they are defined in the DTD. If you have "out-of-order" attributes and don't run make norm, you will get "invalid endpoints" errors during the make post step.
Step one, which normalizes the document writes its errors to $DLXSROOT/prep/w/workshopfa/workshopfa.osgmlnorm.errors. Be sure to check this file.
less $DLXSROOT/prep/w/workshopfa/workshopfa.osgmlnorm.errors
Unfortunately step 1 converts the data to sgml. Step 2, runs osx to convert the normalized document back into XML and produces lots of error messages which are written to
$DLXSROOT/prep/w/workshopfa/workshopfa.osx.errors.These will also result in the following message on standard output:
make: [norm] Error 1 (ignored)These errors are caused because we are using an XML DTD (the EAD 2002 DTD) and osx is using it to validate against the SGML document created by the osgmlnorm step. These are the only errors which may generally be ignored. However, if the next recommended step, which is to run "make validate" again reveals an invalid document, you may want to rerun osx and look at the errors for clues. (Only do this if you are sure that the problem is not being caused by XML processing instructions in the documents as explained below)
Step 5: Validating the normalized file against the dlxsead2002 DTD
make validate2Check the resulting error file:
less $DLXSROOT/prep/w/workshopfa/workshopfa.errors2
We run this step again to make sure that the normalization process did not produce an invalid document. This is necessary because under some circumstances the "make norm" step can result in invalid XML. One known cause of this is the presense of XML processing instructions. For example:"<?Pub Caret1?>". Although XML processing instructions are supposed to be ignored by any XML application that does not understand them, the problem is that when we use sgmlnorm and osx, which are SGML tools, they end up munging the output XML. The preparedocs.pl script used in the "make prepdocs" step should have removed any XML processing instructions.
If this second make validate step fails, but the "make validate" step before "make norm" succeeded, there is some kind of a problem with the normalization process. You may want to start over by running
"make clean"and then going through steps 1-4 again. If that doesn't solve the problem you may want to check your EADs to make sure they do not have XML processing instructions and if they don't, you will then need to look at the error messages from the second make validate.
In this section the workshopfa XML will be indexed with the XPAT search engine, preparing it for use with the DLXS middleware.
First, we need to create the rest of the directories in the workshopfa environment with the following commands:
mkdir -p $DLXSROOT/idx/w/workshopfa
The bin directory we created yesterday holds any scripts or tools used for the collection specifically; obj ( created earlier) holds the "object" or XML file for the collection, and idx holds the XPAT indexes. Now we need to finish populating the directories.
cp $DLXSROOT/prep/s/samplefa/samplefa.blank.dd $DLXSROOT/prep/w/workshopfa/workshopfa.blank.dd

cp $DLXSROOT/prep/s/samplefa/samplefa.extra.srch $DLXSROOT/prep/w/workshopfa/workshopfa.extra.srch
Each of these files need to be edited to reflect the new collection name and the paths to your particular directories. This will be true when you use these at your home institution as well, even if you use the same directory architecture as we do, because they will always need to reflect the unique name of each collection.
(The following commands will change samplefa to workshopfa but if you are not at the workshop, you may also have to change $DLXSROOT)
cd $DLXSROOT/prep/w/workshopfa
vi workshopfa.blank.dd
{esc}
:%s,s/samplefa,w/workshopfa,
:%s,samplefa,workshopfa,
:wq
cd $DLXSROOT/prep/w/workshopfa
vi workshopfa.extra.srch
{esc}
:%s,s/samplefa,w/workshopfa,
:%s,samplefa,workshopfa,
Failure to change even one file can result in puzzling errors, because the scripts
are working, just not necessarily in the directories you are looking
at.
grep -l "samplefa" $DLXSROOT/prep/w/workshopfa/*
will check for changing s/samplefa to w/workshopfa. If you are at the workshop that should be all you need. However if you are doing this at your home institution you need to replace "/l1/" by whatever $DLXSROOT is on your server. If you don't have an /l1 directory on your server (which is very likely if you are not here using a DLPS machine) you can check with:
grep -l "l1" $DLXSROOT/prep/w/workshopfa/*
These steps: creating the directories and modifying the files to use workshopfa instead of samplefa can be done using the $DLXSROOT/bin/f/findaid/setup_newcoll script. See setup_newcoll manpage for more information.
Everything is now set up to build the XPAT index. The Makefile in the bin directory contains the commands necessary to build the index, and can be executed easily.
To create an index for use with the Findaid Class interface, you will need to index the words in the collection, then index the XML (the structural metadata, if you will), and then finally "fabricate" structures based on a combination of elements (for example, defining who the "main author" of a finding aid is, without adding a <mainauthor> tag around the appropriate <author> in the eadheader element). For details on the commands listed below see: Building the Index The following commands can be used to make the index:
make singledd indexes words for EADs that have been concatenated into on large file for a collection.
cd $DLXSROOT/bin/w/workshopfa
make singledd
make xml indexes the XML structure by reading the DTD. Validates as it indexes.
After running this step, if you wish, you can see the indexed regions by issuing the following commands:make xml
xpatu $DLXSROOT/idx/w/workshopfa/workshopfa.dd
>> {ddinfo regionnames}
>> quit
make post builds and indexes fabricated regions based on the XPAT queries stored in the workshopfa.extra.srch file.
make post
You should not see any errors at the workshop. If you do, please let the instructor know. If "make post" produces any errors, you need to fix them before moving on. Assuming there were no errors in the previous steps, the most likely cause of errors are either errors in your "*.extra.srch" file or your EADs may not have an element that is in the "*.extra.srch"
If you get an "invalid endpoints" message from "make post", the most likely cause is XML processing instructions or some other corruption. The second "make validate" step should have caught these. Other possible causes of errors during the "make post" step include syntax errors in workshopfa.extra.srch, or the absense of a particular region that is listed in the *.extra.srch file but not present in your collection. For example if you don't have a <famname> in any of the EADs in your collection you would get this error:
Error found:To fix this you would have to edit theNo information for region famname in the data dictionary.
*.extra.srch file.For more information on working with fabricated regions and editing the *.extra.srch file see:
At this point it is a good idea to do some testing of the newly created index. Invoke xpat with the following commands
xpatu $DLXSROOT/idx/w/workshopfa/workshopfa.ddTry searching for some likely regions. Its a good idea to test some of the fabricated regions. Here are a few sample queries:
>> region "ead"
  1: 3 matches

>> region "eadheader"
  2: 3 matches

>> region "mainauthor"
  3: 3 matches

>> region "maintitle"
  4: 3 matches

>> region "admininfo"
  5: 3 matches
Before we leave the xpat prompt run this command to see a list of all the regions indexed including both EAD elements and fabricated regions
>> {ddinfo regionnames}
For the purposes of the workshop we ran through all the steps by hand. We recommend you do this when first setting up a new collection. Once you have succeeded in indexing a collection without errors, if you just want to index additional items, you can run the data prep and indexing steps using the make all command. For more details on this and other make options see: Details of Makefile options
The make post step and the testing steps above leads us into a discussion of the use of fabricated regions in FindaidClass. Findaid Class uses the workshopfa.extra.srch file to add fabricated regions to the XPAT index.
"Fabricated" is a term we use to describe what are essentially virtual regions in an XPat indexed text. See a basic description of what a fabricated region is and how they are created.
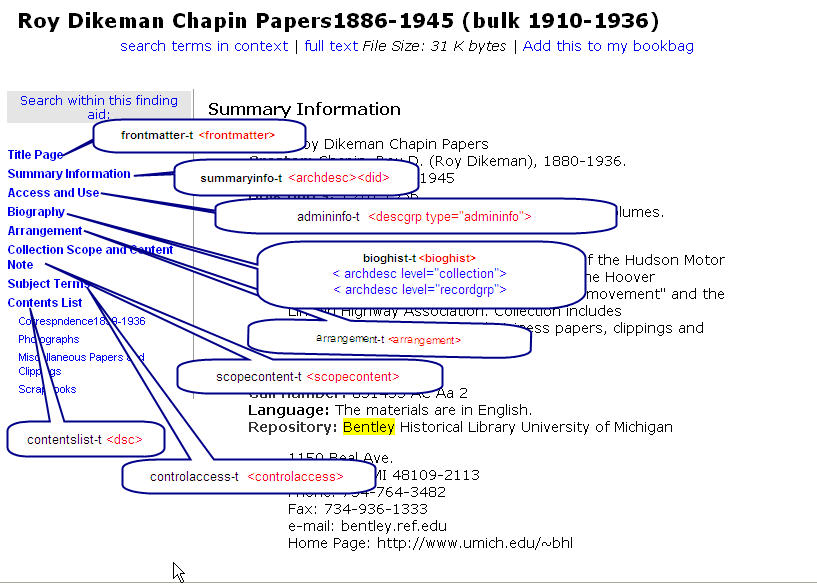
In Findaid Class the majority of fabricated regions are used to produce the Table of Contents and to implement display of EAD sections as focused regions such as the "Title Page" or "Arrangement" The fabricated regions are used so XPAT can have binary indexes ready to use for fast retrieval of these EAD sections when the user clicks on an entry in the table of contents. ( See Working with the table of contents and TOC image for more information on the use of fabricated regions for the table of contents.)
Findaid Class uses fabricated regions for several purposes
(region ead); {exportfile "/l1/idx/b/bhlead/main.rgn"}; export; ~sync "main";
whereas in TextClass "main" can refer to <TEXT>. Therefore, both FindaidClass and TextClass can share the Perl code, in a higher level subclass, that creates searches for "main".
(region "corpname" + region "famname" + region "name" + region "persname"); {exportfile "/l1/idx/s/samplefa/names.rgn"}; export; ~sync "names";
The DLXS software is primarily designed as a system for mounting University of Michigan collections. In the case of finding aids, the software has been designed to accommodate the encoding practices of the Bentley Historical Library. Most of the questions we get from sites implementing FindaidClass for the first time involve dealing with encoding practices that are different than the Bentley's.
A number of issues related to varying encoding practices can be resolved by the appropriate edits to the *.extra.srch file. We will discuss these in Customizing and Troubleshooting Findaid Class
These are the final steps in deploying an Findaid Class collection online. Here the Collection Manager will be used to create a Collection Database entry for workshopfa and configure it for browse building. The Collection Manager will also be used to check the Group Database. Finally, we need to work with the collection map and the set up the collection's web directory.
Each collection has a record in the collection database that holds collection specific configurations for the middleware. CollMgr (Collection Manager) is a web based interface to the collection database that provides functionality for editing each collection's record. Collections can be checked-out for editing, checked-in for testing, and released to production. In general, a new collection needs to have a CollMgr record created from scratch before the middleware can be used. The copy functionality can make this easier by allowing you to clone a collection with characteristics like your new collection.
Create a workshopfa Collmgr entry by copying from samplefa.
http://username.ws.umdl.umich.edu/cgi/c/collmgr/collmgr
username=dlxsadm
password=XXXX
The collmgr page is usually set up to use apache basic authorization. The username and password should have been set up when you set up your virtual host in apache. (sample apache virtual host )
WARNING! If you forget to change one of the entries it can lead to very confusing results. For example if you forget to change the "dd" file entry from "/idx/s/samplefa/samplefa.dd" to /idx/w/workshopfa/workshopfa.dd", the middleware will try to search the samplefa collection but all the rest of the configuration information will point to workshopfa, which will result in erratic behavior and potentially confusing error messages.
More Documentation
Dynamic browsing is a feature available since DLXS release 12. Adding dynamic browsing to a collection is a matter of simple configuration in CollMgr and then running a script on the command line to populate the browse tables with data to facilitate browsing.
Collmgr field: browseable
To enable browsing, the browseable field must be set to "yes".
Collmgr field: browsenav
The browsenav field must have a value of 0, 1 or 2. Small collections should use 0. Medium collections 1. Large collections 2. This is the number of layers of browse tabs you want for the collection. 0 means that all the items are on one page -- no tabs. 1 means you have one layer of tabs with the letters of the alphabet, and 2 means you have two layers of tabs -- one for a letter, and another for the two-letter subdivisions under it.
The browseupdatemodule field can be left at the default BrowseUpdate/FindaidBU. If you have unusual markup in your mainauthor, maintitle, or subject regions, you may need to make a subclass to make sure that the browse fields are displayed correctly.
Collmgr field: browseupdatemodule
Collmgr field: browsefields
browsefields holds the list of fields you would like to be browseable. This list is used to prepare the data for browsing, and also to present browsing options to the user. Currently, author, title and subject are the canonical Findaid Class browse fields. If you have unusual markup in any of these regions, you may need to subclass or customize Browse::FindaidBU. You will need fabricated regions of mainauthor (as appropriate) maintitle and subjects to support browsing.
Now that we are finished updating CollMgr, we need to release our collection to production.
With the above fields properly configured and CollMgr released, the updatebrowsedb.pl script can be run. It populates the ItemColl, ItemBrowse and ItemBrowseCounts tables with information from the collection's data dictionary. You should use the "wrapper" shell script provided in the same subdirectory, ub .
cd $DLXSROOT/bin/browse
./ub -C findaid -c workshopfa
Another function of CollMgr allows the grouping of collections for cross-collection searching. Any number of collection groups may be created for Findaid Class. Findaid Class supports a group with the groupid "all". It is not a requirement that all collections be in this group, though that's the basic idea. Groups are created and modified using CollMgr.
http://username.ws.umdl.umich.edu/cgi/c/collmgr/collmgr
We won't be doing anything with much with groups, but you can add your workshopfa to the Sample group, if you'd like. Be sure to release the group to production if you want any changes to be available in your interface.
Collection mapper files exist to identify the regions and operators used by the middleware when interacting with the search forms. Each collection will need one, but most collections can use a fairly standard map file, such as the one in the samplefa collection. The map files for all Findaid Class collections are stored in $DLXSROOT/misc/f/findaid/maps
Map files take language that is used in the forms and translates it into language for the cgi and for XPAT. For example, if you want your users to be able to search within names, you would need to add a mapping for how you want it to appear in the search interface (case is important, as is pluralization!), how the cgi variable would be set (usually all caps, and not stepping on an existing variable), and how XPAT will identify and retrieve this natively (in XPAT search language).
The first part of the map file is operator mapping, for the form, the cgi, and XPAT. The second part is for region mapping, as in the example above.
cd $DLXSROOT/misc/f/findaid/maps

cp samplefa.map workshopfa.map
You might note that some of the fields that are defined in the map file correspond to some of the fabricated regions.
Each collection may have a web directory with custom Cascading Style Sheets, interface templates, graphics, and javascript. The default is for a collection to use the web templates at $DLXSROOT/web/f/findaid. Of course, collection specific templates and other files can be placed in a collection specific web directory, and it is necessary if you have any customization at all. DLXS Middleware uses fallback to find HTML related templates, chunks, graphics, js and css files.
For a minimal collection, you will want two files: index.html and FindaidClass-specific.css.
mkdir -p $DLXSROOT/web/w/workshopfa
cp $DLXSROOT/web/s/samplefa/index.html $DLXSROOT/web/w/workshopfa/index.html
cp $DLXSROOT/web/s/samplefa/findaidclass-specific.css $DLXSROOT/web/w/workshopfa/findaidclass-specific.css
As always, we'll need to change the collection name and paths. You might want to change the look radically, if your HTML skills are up to it.
Note that the browse link on the index.html page is hard-coded to go to the samplefa hard-coded browse.html page. You may want to change this to point to a dynamic browse page (see below). The url for the dynamic browse page is ".../cgi/f/findaid/findaid-idx?c=workshopfa;page=browse". Example
If you would prefer a dynamic home page, you can copy and modify the
home.xml and home.xsl files from $DLXSROOT/web/f/findaid/. Note that they are
currently set up to be the home page for all finding aids collections, so you
will have to do some considerable editing. However they contain a number of
PIs that you may find useful. In order to have these pages actually be used
by DLXS, they have to be present in your $DLXSROOT/web/w/workshopfa/
directory and there can't be an index.html page in that
directory. The easiest thing to do, if you have an existing
index.html page is to rename it to "index.html.foobar" or
something.
http://username.ws.umdl.umich.edu/cgi/f/findaid/findaid-idx
There are a number of reasons you might like to link from a finding aid to another website. Perhaps you have digitized artifacts you'd like to link from DAOs. Maybe your Additional Descriptive Data contains a bibliography, and you'd like to link to published volumes in your OPAC. There might be another website out there that covers your topic well and you just want to create an external pointer to it. How do you do this?
Findaid Class is coded so that if DaoResolution is enabled and there is an href attribute to the <dao> element, it will check to see if it contains the string "http". If it does, FindaidClass will create a link based on the content of the href attribute of the <dao>. For example, the Archives of Michigan have DAOs in this form:
That displays like this in the container list:<dao linktype="simple" href="http://haldigitalcollections.cdmhost.com/u?/p4006coll15,18455" show="new" actuate="onrequest"><daodesc><p>[view image]</p></daodesc></dao>
Records of the Michigan Military Establishment
If you wish to link from an element other than a <dao>, you'll have a little bit of work to do, depending on which element will contain the link, and what the value of the show attribute might be. The Clements Manuscript Division often has extenisve bibliographies as Additional Descriptive Data, and they wanted links from the titles to their entries in Mirlyn.
Lydia Maria Child papersHere is an example of their encoding:
<title render="italic" linktype="simple" href="http://mirlyn.lib.umich.edu:80/F/?func=direct&doc_number=004618335&local_base=AA_PUB" show="replace" actuate="onrequest">The family nurse; or Companion of The frugal housewife. By Mrs. Child... Revised by a member of the Massachusetts medical society</title>
In order to make this work as they wished, we had to adapt the way that title handling was done in the XSLT. In this case, it is in the text.components.xsl file, which had a copy made into the collection web directory with this style:
 <xsl:template match="title[@linktype='simple']">
    <xsl:choose>
      <xsl:when test="@href">
        <xsl:element name="a">
          <xsl:attribute name="href">
            <xsl:value-of select="@href"/>
          </xsl:attribute>
          <xsl:if test="@render = 'italic'">
            <xsl:attribute name="class">
              <xsl:text>title</xsl:text>
            </xsl:attribute>
          </xsl:if>
          <xsl:if test="@show = 'new'">
            <xsl:attribute name="target">
              <xsl:text>linkWindow</xsl:text>
            </xsl:attribute>
          </xsl:if>
          <xsl:value-of select="."/>
        </xsl:element>
      </xsl:when>
<xsl:otherwise>
   <xsl:element name="i"><xsl:value-of select="."/>
        </xsl:element></xsl:otherwise>
    </xsl:choose>
  </xsl:template>
If there is no "http" string in the href attribute of a <dao>, FindaidClass assumes that the href attribute is actully an id and will look up that id in in the idresolver and build a link if it finds the ID in the IDRESOLVER table. The method FilterAllDaos_XML in $DLXSROOT/cgi/f/findaid/FindaidClass.pm can be overridden per collection if different behavior is needed.
If you decide to use this feature, you will want to modify the preprocessing script preparedocs.pl which out-of-the-box inserts the string 'dao-bhl-' after the href. Below is an example of a Bentley <dao> where the id number is 91153-1.
<dao linktype="simple" href="91153-1" show="new" actuate="onrequest">
         <daodesc>
          <p>[view selected images]</p>
         </daodesc>
        </dao>
The preparedocs.pl program would change this to:
<dao linktype="simple" href="dao-bhl-91153-1" show="new" actuate="onrequest">
         <daodesc>
          <p>[view selected images]</p>
         </daodesc>
        </dao>
The ID resolver would look up the id "dao-bhl-91153-1" and replace it with the appropriate URL.
<dao linktype="simple" href="http://images.umdl.umich.edu/cgi/i/image/image-idx?q1=91153-1;rgn1=bhl_href;op2=And;q2=;rgn2=bhl_al;type=boolean;med=1;view=thumbnail;c=bhl" show="new" actuate="onrequest">
         <daodesc>
          <p>[view selected images]</p>
         </daodesc>
        </dao>
In order to make use of ID resolution in Findaid Class :
ID Resolver Data Transformation and Deployment
The ID Resolver is a CGI that takes as input a unique identifier and returns a URI. It is used, for example, by Michigan County Histories to link the text pages in Text Class middleware to the image pages in the Image Class middleware, and vice versa.
Plug something like the following in to your web browser and you should get something back. If you choose to test middleware on a development machine that uses the id resolver, make sure that the middleware on that machine is calling the resolver on the machine with the data, and not the resolver on the production server.
<ITEM MTIME="20030728142225"><ID>dao-bhl-bl000684
    </ID><URI>http://images.umdl.umich.edu/cgi/i/image/image-idx?&q1=bl000684&rgn1=bhl_href&type=boolean&med=1&view=thumbnail&c=bhl
    </URI></ITEM>
Information on how to set up the ID resolver
The EAD standard was designed as a "loose" standard in order to accommodate the large variety in local practices for paper finding aids and make it easy for archives to convert from paper to electronic form. As a result, conformance with the EAD standard still allows a great deal of variety in encoding practices.
The DLXS software is primarily designed as a system for mounting University of Michigan collections. In the case of finding aids, the software has been designed to accommodate the encoding practices of the Bentley Historical Library.
Most of the questions we get from sites implementing FindaidClass for the first time involve dealing with encoding practices that are different than the Bentley's. The Findaid Class code makes various assumptions about the structure and markup of the EADS. If your encoding practices differ significantly from the Bentley's, the resulting conflict may show up as error messages during data prep or indexing, or as various symptoms such as titles not showing up or specific sections of the finding aid not rendering properly.We will first look at the range of possible changes you might make, the look at a few of issues involved in data preparation. We will then spend some time on fabricated regions and then we will look at making changes to the Table of Contents. The modifications to the Table of Contents will involve a number of useful techniques such as subclassing FindaidClass and making class-specific changes by creating custom xsl files. Please note that we will be going over a lot of material fairly quickly so you aren't expected to try to implement the changes in the workshop today.
The general procedure we recommend for working with a new collection is to do the data prep steps one at a time, checking for errors after each step and fixing them before proceeding to the next step.
General Data Prep IssuesFabricated regions are set up in the $DLXSROOT/prep/c/collection/collection.extra.srch file. The sample file $DLXSROOT/prep/s/samplefa/samplefa.extra.srch was designed for use with the Bentley's encoding practices. If your encoding practices differ from the Bentley's, or if your collection does not have all the elements that the samplefa.extra.srch xpat queries expect, you will need to edit your *.extra.srch file.
We recommend a combination of the following:
Depending on your knowledge of your encoding practices you may prefer to do "up front analysis" first prior to running "make post". On the other hand, running "make post" will give you immediate feedback if there are any obvious errors.
1. Run the "make post" and iterate until there are no errors reported.Run the "make post" step and look at the errors reported. Then modify *.extra.srch and rerun "make post". Repeat this until "make post" does not report any errors.
The most common cause of "make post" errors related to fabricated regions result from a fabricated region being defined which includes an element which is not in your collection.
For example if you do not have any
Error found:So you could edit the rule to eliminate the "famname" element:No information for region famname in the data dictionary. ( (region "persname" + region "corpname" + region "famname" + region "name") within (region "origination" within ( region "did" within (region "archdesc") ) ) ); {exportfile /l1/workshop/user11/dlxs/idx/s/samplefa/mainauthor.rgn"}; export;~sync "mainauthor";
(
     (region "persname" + region "corpname" + region "name")
      within
       (region "origination" within
          ( region "did" within
               (region "archdesc")
          )
       )
      );
{exportfile /l1/workshop/user11/dlxs/idx/s/samplefa/mainauthor.rgn"}; export;~sync "mainauthor";
An alternative that is useful when you are just indexing a few EADs and you anticipate that when you have the whole collection indexed there will be at least one EAD with the region in question (
You may be able to analyze your collection prior to running "make post" and determine what changes you want to make in the fabricated regions. If your analysis misses any changes, you can find this out by using running make post as described above or exercising the web interface as described below.
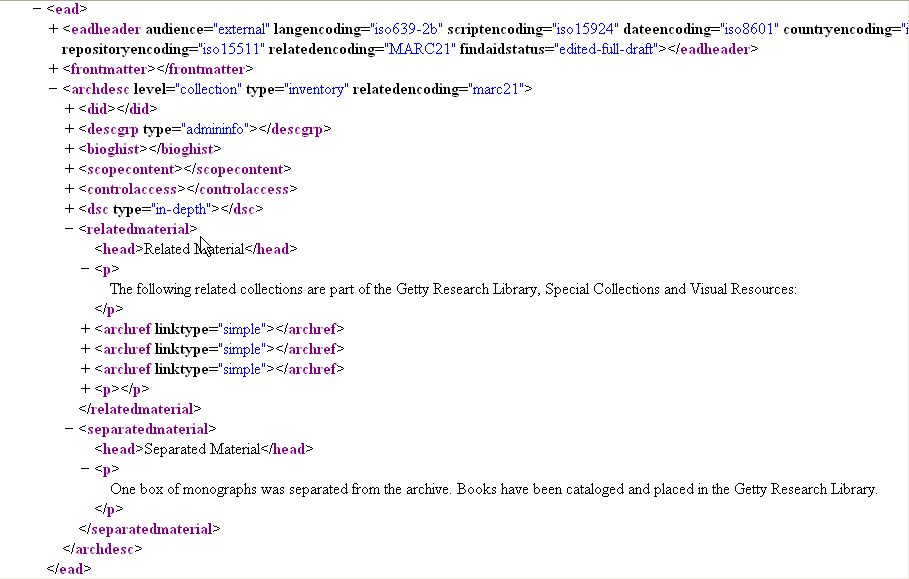
You may already know that you have some regions that are not in samplefa.extra.srch, that you would like to display in the table of contents. For example "related material" and "separated material"
If you want to check to make sure the fabricated region queries in your *.extra.srch are not expecting any regions not in your collection,once you have run "make xml" , but before you run "make post", start up xpatu running against the newly created indexes:xpatu $DLXSROOT/idx/w/workshopfa/workshopfa.ddthen run the command
>> {ddinfo regionnames}
This will give you a list of all the XML elements, and attributes. Alternatively you can create a file called xpatregions and insert the following text:
$ xpatu $DLXSROOT/idx/w/workshopfa/workshopfa.dd < xpatregions > regions.out
Then you can use the "regions.out" file you just created to sort and examine the list of regions which occur in your finding aids. By checking the fabricated region queries in your copy of samplefa.extra.srch ( which you copied to workshopfa.extra.srch) you can see if the EADs you indexed are missing any regions that occur in the fabricated region queries.
3. Exercise the web user interface,It is best to use the other two techniques until "make post" does not report any errors. At that point you can then look for other possible problems with the searching and display which may be caused by differences between your encoding practices and those of the Bentley. (The samplefa.extra.srch fabricated regions definitions are based on the Bentley's encoding practices).
Once "make post" does not report errors, you can follow the rest of the steps to put your collection on the web. Then carefully exercise the web user interface looking for the following symptoms:
For more information on regions used for searching and rendering and on how to create your own fabricated regions see Working with Fabricated Regions in Findaid Class
Some of the problems related to encoding practices which require changes to fabricated regions include:
Note: In this section we will present several examples that demonstrate various ways to troublehoot and customize DLXS Findaid Class. Unlike the previous sections, these examples are not designed for you to follow along.
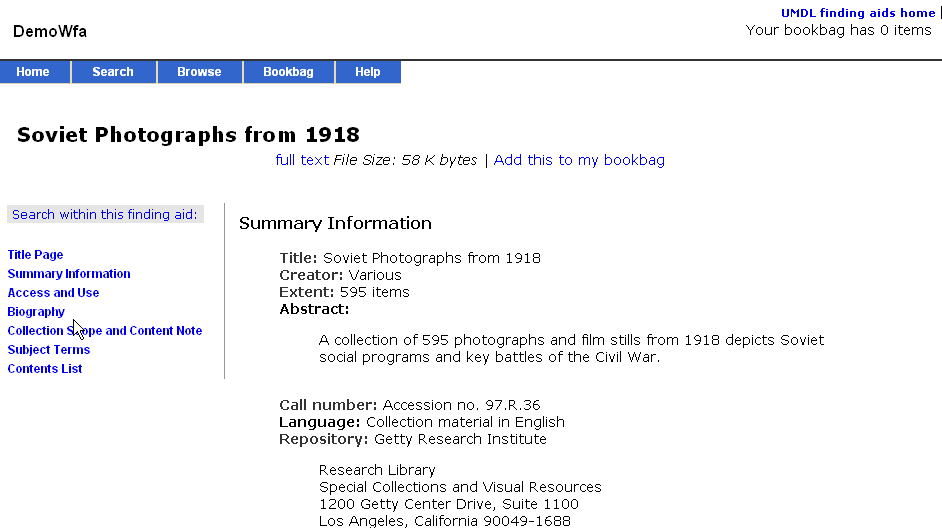
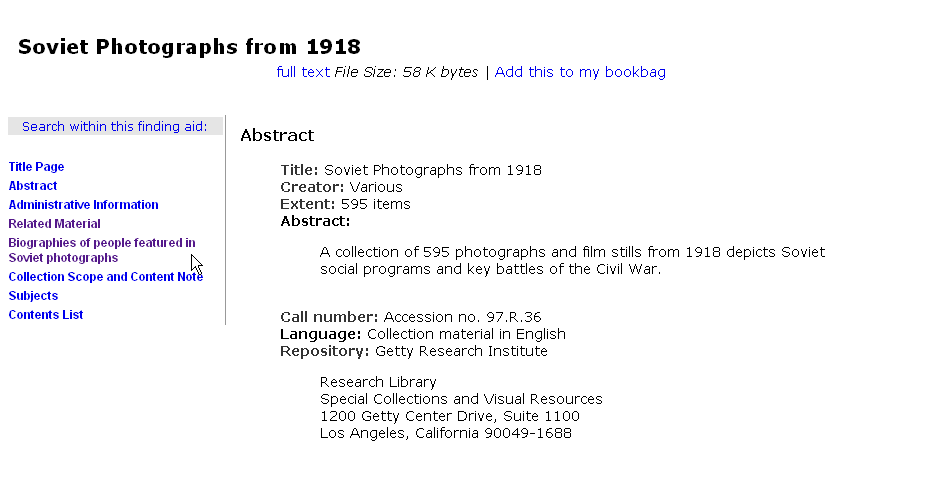
Modifying the Table of Contents will enable us to show a variety of techniques for making changes to Findaid Class. We also want to demonstrate that creating a subclass is not as frightening as it may sound. We will work with a collection called demofa. The demofa collection contains a variety of real and specially modified finding aids selected or constructed to demonstrate various issues with non-Bentley encoding practices. The version of the demofa collection used in this demonstration can be considered the "before" state, where various encoding issues have not been dealt with by changing the defaults. The version that ships with DLXS and is documented in the wiki, is the "after" version, where changes have been made to accomodate non-Bentley encoding practices
Changing labels in TOC (See Wiki for background and details)Samplefa uses a subclass called SamplefaFC, which is specified in CollMgr. We will create our own subclass by copying SamplefaFC.pm to DemofaFC.pm.
Adding TOC headings and regions for related and separated material
Changing Biohist labels to use the <head> element
The steps here are similar to the steps we showed for adding separated and related material. However some tricky coding is needed. We provide that coding so that you just have to copy the provided files and change the default text that you want to appear when there is no Bioghist < head > in the tocheads hash and the xsl as documented in the wiki: Changing the Bioghist labels to use the appropriate <head > elements
In this default implementation you can see that the middleware is labeling the bioghist "Biography", despite the much more descriptive text in the head element (see below)
<bioghist>
     <head>
          Biographies of people featured in Soviet photographs
     </head>
 ....
</bioghist>
Once the changes have been made the text in the first head element in the bioghist will display bioghist with label coming from the head element
quick review and other issues